We will stand on principle, or we will not stand at all.
Klondike – The Lost Expedition – Beginner’s Guide
PAGE 2 – User interface and main gameplay (completed)
Table of contents of this page:
1 Bank
2 Workforce
3 Energy Meter
4 Player Interface.
5 Control Bar
6 Partnership System
7 Notebook
8 Premium Offers and Side Quests
22 The Storage (yes I mistook the order :-).
21 The Market
10 Cursor type
11 Combo Chop Option
9 Hide Neighbours
12 News
13 Achievements
14 Map
15 Adventures (info panel)
16 Collections (Moved to dedicated Page) 17 Gift Interface and how to properly use it
18 Story Adventures and types of Lands 19 In depth guide about all Events in the game
Surprisingly, many players ask me questions about the user interface. I agree that it is not the most intuitive UI. It looks very good. but also many elements are hidden from direct access. Let’s break down each element.
1 The Bank.
The bank is an interface that can be accessed clicking in two separated but near horizontal bars.
The first bar is the Coin Amount Bar. It shows how much Dog Coins (main game currency) you have at that moment. Clicking over it or the green plus icon just besides it opens the Bank in the Coin Selling Tab.
Tip.: Free players should NEVER buy coins with Emeralds. NEVER. Dog Coins is a very cheap currency in the game and you can make lots of it very fast. It’s not worthy to spend real life money into them. On the other hand, paying players may find buying coins not that useful after the first stages of the game.
The second bar is the Emerald Amount Bar. It shows how much Emeralds you have at that moment. Emeralds are the premium currency of the game, bought with real life money or earned free from various sources. Clicking over it or the green plus icon just besides it opens the Bank in the Emerald Selling Tab (one of the many links to buy them).
Tip.: Don’t forget your SECOND FREE daily gift under the Emerald’s tab (picture bellow). Every 24h there will be another free gift to be claimed in this tab. (You already received the first daily gift the moment you logged on).
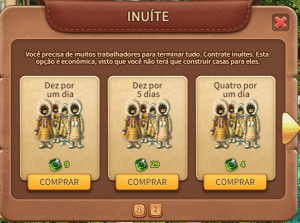
2 The Workforce
In order to make your factories work, you need to hire workers. They can be your neighbours or Inuks. Hiring neighbours cost Dog Coins and you must provide housing for them while they stay at your station. Hiring Inuks doesn’t require housing, but they cost Emeralds. These 2 icons inform how many available accommodations you have to hire more workers, how many workers you currently have and how many are effectively working.
In the example you can see:
281 houses occupied.
282 houses in total.
268 people at work.
283 people in total.
These numbers will vary. As you play, you’ll get more free workers. At the very start, you have both Silent Shadow and Dull Echo working for you. They are permanent and cost nothing. At the end of main storyline, the main character parents, Paul and Kate will also work at your station permanently for free.
Clicking over the second icon brings up the Inuk Hiring Tab where you can pay Emeralds for more workers temporarily.
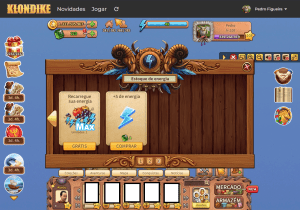
3 The Energy Meter
Klondike is a game all around the management of 3 things: resources, travelling and energy. The Energy Meter shows your current Energy points, which are used to execute 2 main tasks: growing crops of vegetables (farming) and chopping down objects (exploring). There are lots of ways to increase the amount of energy you currently hold, what I’ll cover in a following section.
Clicking over this blue horizontal bar opens the Energy Shop interface. From there, you can use Emeralds to buy more energy and/or dynamites (item used in exploration).
Tip.: Don’t forget your FREE energy daily recharge at energy tab number 3 (picture bellow). The third tab of this shop has an option to fulfil your energy meter to your current max amount of energy.
a) It will not surpass your energy limit. If your current max energy is 35 and you have 15 energy left, it will not give you 35 additional energy (50 total), but will fill up to 35 only.
b) It can be used only once a day. After that, you can spend Emeralds for the same effect.
c) It is very useful and should be used daily, especially when harvesting crops.
4 The Player Interface.
More precisely, 1 of the 3 player’s interfaces. Let’s call it ”Interface B”. To not make it more complicated that it already is, I’ll cover them in order.
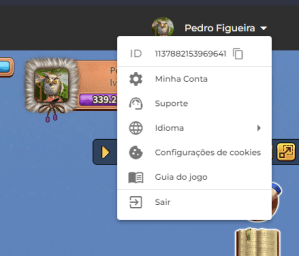
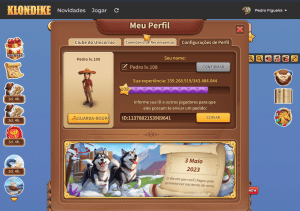
Player Interface A: At the top right, inside the black stripe over the game frame, you can see an icon with your name. That is the main player interface. It has an arrow that allows you to access some game settings. There you can change your avatar, put a picture you like, change your ID name and check other details of your account. You can also change the game language, check the official game guide and contact support.
Player Interface B: Inside the game frame, clicking over horizontal bar that holds your picture, you access an interface with lots of premium options. You can see the day you registered your account and your user ID.
Player Interface C: Clicking in your avatar (the walking doll) opens up a third interface. There you can change your in-game name, change your avatar’s clothing and gender.
Note: your in-game’s name does not need to be the same as your ID name. Matter of fact, your in-game’s name has a limit of 12 characters. If you left it blank, your ID name will be shown. In this case, it will have as many characters as your ID itself. If your name is too big, the characters will be scaled down and may not be well visible in lower resolutions.
Many players use to write TRD, TR (trader) in their in-game names to indicate they have trading stalls and are willing to negotiate goods. It makes easier to search for them. Others like me put their current game level. The game has a juvenile thematic and is played by many elderly people. Choose a nickname that is not offensive.
5 The Control Bar
The very useful Control Bar stays permanently at the right side of the screen and allows you quick access to the main controls of the game frame.
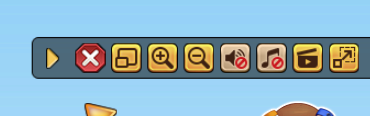
The first button is a horizontal arrow. It allows you to hide the Control Bar when you don’t need it.
The second button is a red ”x” icon. It’s the ”stop all avatar actions” command. It is so important it cannot be hidden, and always stays overlaid in any given map and your home station. Notable clarifications:
Any given input you give to your game’s avatar (the walking doll) is an order it receives and subsequently executes. If you click on an empty space, your avatar will walk over there, or teleport if the distance is too far. Your avatar will also walks/teleports to a destination when you give it the command to plant crops, collect production, chop down objects etc.
All these commands can be set in sequence. It becomes a queue of actions your avatar will execute in the exact order you set. I’ve found no limit of the number of orders your avatar can ”memorize”.
All these actions take 2 real life seconds. When chopping an object, you can see a small blue circle timer indicating the avatar is performing the chopping action. During this small timeframe, you can cancel the chopping order.
Tip: The ”stop all actions” button clears all actions left in the queue.
Tip: The ”stop all actions” button stops your own avatar only. To stop your Inuks, you must use the cancel option at their huts!
The third button is the fullscreen option. You can set the game frame to fullscreen instead of inside your browser.
Tip: Setting the game to fullscreen allows you to zoom in and zoom out using your mouse wheel.
Note: I personally use the browser own fullscreen (F11 key at keyboard) because I can also zoom the entire game frame beyond the normal zoom. I set the game page to be at 150% zoom, so I can see things better.
The next pair of buttons are the in-game zoom in and zoom out respectivelly.
The next pair of buttons are the mute buttons, one for the game sounds and the other for the music, respectively. Muting the game music is useful when you have background radio music. The old game music was quite annoying and repetitive, so many players choose to let it permanently mute. Current game music is way better and I tend to let it on.
Tip.: When collecting eggs or playing at Leontius’ Mines, turn the sounds off. The high pitch noise of many things being collected at the same time may drive new players out of the game, unfortunately…
The next one is the “animation button”. It has a ”movie” icon and allows a very useful trick. This button lets you choose amongst 3 levels of animations. When full gold (in the picture), all animations are shown. But when turned off (just like the sounds buttons in the picture), most animations are turned off.
Tip: Turning animations off makes your Inuks and Cats collect everything faster. Their walking animation is turned off, so they just teleport to their next target and collect.
In my experience, in a full home station covered in egg nests, the Orange Cat takes 1 hour (round) to collect all eggs. If the animation is turned off, it’s just 4 minutes. At my Wind Song’s orchard, the Inuks take around 40 minutes to walk over all 624 trees, but less than 2 minutes teleporting. I see the same improvement time when they collect over 100 vegetable complexes.
This trick speeds things so much I find the Moon Guardian to be not worth its price or effort to get it for free.
Also, livestock (both birds and cows) remain in place without fences and feed from anywhere in the map without walking. The only exception are the Black Swans that for some reason don’t remain static.
The last button is the Dimensioning Button. It turns on/off the ability to zoom from the browser.
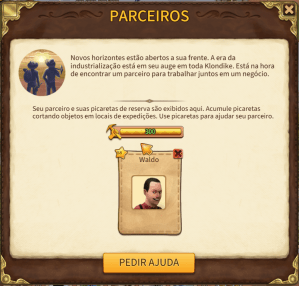
6 The Partnership System’s interface
This system incentives people to play together, but I think it’s better to have someone you know in real life playing with you. I explained the use of the system in the ENERGY GUIDE. Here we’ll focus in the interface itself.
Bellow the Control Bar, you find the “Partner Icon” which opens the Partnership Interface. Personally, I never use partnership. If you manage your energy wisely, there is really no need (or use at all) for a partner in this game. However, I understand that other players may use it, so here some notes:
Partnership is a system that can be used only in expeditions, may they be temporary or permanent lands. You cannot use it at your home station.
You and a friend (must be an in-game neighbour) set yourselves as partners. You can have only 1 partner at any given moment. You must dissolve a partnership before looking for another. After dissolving a partnership you must wait 24 hours to set another partner, so no jumping around is allowed.
Each time you chop down an object at lands, you receive golden pickaxes. These pickaxes are not random and are awarded increasingly accordingly to the combo you make. At least 10 combo chop must be performed and it awards 1 pickaxe. A 150 combo chop awards 37 pickaxes. You can accumulate at most 300 golden pickaxes and use them to chop items at your partner’s lands at their discretion. You receive no bonus or items for chopping. Golden pickaxes can also be awarded as gifts occasionally during events.
The interface is quite simple. It shows the amount of Pickaxes you currently have (not your partner) and the picture of your partner. To remove a partner, just click the red ”X” button just over the picture.
7 The Notebook
As the name implies, the notebook is an interface where you can write any notes about the game. It is accessible at your home station and during any expedition. It helps you to remember what to do, what to collect etc. You can write all notes by yourself and reach your sled’s cargo counter. However the main feature it holds is the capability to record the items you need to transport for any barter recipe. At any bartering or construction interface, you will find an icon with a pen over a notebook. Clicking it automatically registers that recipe at the notebook.
This automatic record is really a shortcut to the current storage you have access. It can load items directly into your sled from the notebook interface, so you don’t need to open the storage and manually search for the items. You can see in the image above an example. The first item must be acquired in the land. The second item (Mechanism) can be brought from elsewhere. It has a small plus icon, which is a shortcut to put it in your wish list (more about this in the Gift section). The third item is the result of the barter. At its bottom left, you can see the icon to record the recipe in your notebook.
The recipes also can be updated using the same pen over a notebook icon, as the constructed object requires other items.
Note: the notebook is language dependent. If you register an annotation in one language and open the game in another language, the records will not work. You can see in my example, my anotations in Portuguese do work, but the annotations in English don’t.
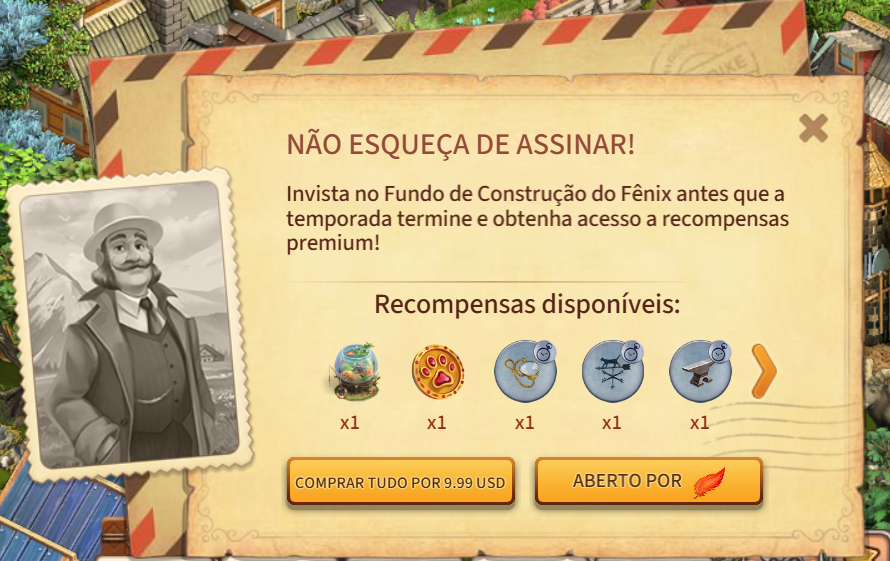
8 – The Premium Offers and Side Quests.
Just bellow the Notebook, you will find all current Premium offers. These interfaces will allow you to buy boosts for the game to speed up the play. I am a free player (I’ve never paid to play this game), but I’m considering investing some money to help support its development. I cannot tell you how you should use your money. It’s your money after all. However, I can give you some perspective from a player who knows a thing of two of how the game runs.
1 – Use Emeralds to buy only the Premium Items. May they be premium expansions, premium decorations or premium buildings, all other items can be collected for free if you have patience. And even so, only the Bakery is truly required to play the game properly.
2 – Have patience to wait for the sales week. Thrice a year, developers sell these premium items for half their price.
3 – The Construction Trust event (CT) is the BEST deal for premium players. You can acquire a lot of powerful items for a fraction of their price.
4 – The Unicorn Club helps a lot. A LOT. Both your sled capacity and your energy capacity receive a boost. If you are a premium player and have a little more money to spare, just go for it. It is way cheaper than the sum of timed offers and more useful. Timed offers rely on selling dynamites. Even though useful, the Unicorn Club gives you the continuous boost to reach 100+ energy, what values the equivalent of endless dynamites.
Some extended advice from my original tip list:
Tip: Free Players should avoid spend gems outside sale week. At the very beginning of the game, Emeralds are quite rare. After a year or two, not so rare anymore. With proper strategy, you can earn dozens of Emeralds per month. You should wait some months collecting Emeralds and then buy Bakeries with a great discount.
–
Tip: Get info about NPC’s such as Mohan Rich, Santa Claus, Bartolomeo and the Merchant BEFORE BUY premium items. More about these Premium Items in the EXTRA PAGE.
8.1 Side Quests
Not showed in the picture, just bellow the Premium offers you will find the current land side quests, if any. Many lands have side quests, quests that do not need to be completed but if done will give you great rewards, usually gifts containing items and Emeralds. I suggest to always complete these side quests. In permanent lands, you’ll need to clear the whole land to get its special reward anyway. In temporary lands (updates included) the prizes are worthy the effort.
The bottom interface.
The bottom interface is a convoluted heap of buttons and icons. You’ll not click in most of these.
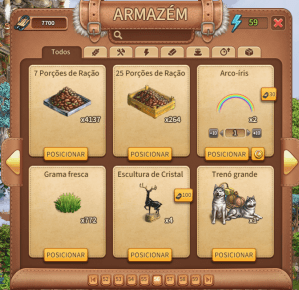
22 The Storage (yes I mistook the order when I wrote this page :-).
This interface allows you to access the storage at your current location. If you are at your Home Station, you’ll access the items stored at home. At expeditions, you can only access the items currently there. The interface has a shortcut to your sled’s cargo at left, a counter for the amount of energy you currently have at right, and a search bar at the middle. Bellow the search bar, you can see filter tabs for types of items.
Note: Special expeditions, such as Tiger Mines, Mazes, Railroad Side Quest and Special Lands use your Home Station’s storage.
As time passes by and the game continuously develops, the storage interface gained some improvements. You can now select its tabs to filter what kind of items you are looking for. E.g., clicking in the energy filter (thunderbolt) will show you all your energy items, such as snacks, dynamites and loud bullets. The harvest icon (a rye crop) will show you all your stored crops.
Unfortunately you cannot rearrange the order of the items from this interface.
Tip: If you load all of a current item into your sled and unload it, they will reappear at the end (last tab page) of the storage. You can load/unload to rearrange the order of the items. It pleases my OCD.
If you don’t care where the items are as long as they are accessible, there is a better feature to find them. Using the search bar at the top right of the interface, you can locate instantly any item at the current storage.
Tip: The search bar works together with the filter tab. Select “all” tab before searching to ensure the result covers all items.
21 The Market
This interface allows you to buy both common and premium items. It works in the same fashion as the storage.
1 – You’ll find only items available at the land you currently are.
2 – You can use the search bar to find a specific item you want to buy.
3 – The tabs filter items accordingly to their group.
You also have shortcuts to the Bank interfaces.
Tip: Take your time to navigate the Market. See what can be bought, how much it costs etc. Pay a visit to the Animals Tab >> Dogs. There you’ll see sled improvements.
10 The Cursor Type.
This small shortcut will open the Cursor Type interface. Here you can select the behaviour of your cursor. These options vary accordingly to the land you currently are. At home station, you do not have some options available.
Mode 0 – At any time, you can select the option “Complete”. This will close the interface and your cursor goes back to default mode. Mode 1 – Move: select this option to move objects around the land. If an object cannot be moved, it will inform you. Mode 2 – Rotate: select this option to rotate objects, mostly decorations, but also some building. If an object cannot be rotated, the cursor will do nothing.
Tip: Some large factories, such as the Milk Plant change their footprint when rotated. Try rotate your buildings to find the best way to save space.
Mode 3 – Sell: Select this option to sell an object. If it cannot be sold, it will inform you. WARNING: some objects do not require confirmation for selling.
Note: after selling a building, you’ll get SOME of the materials needed to build it back. Usually 1/3, and never all the materials spent. IT WILL NEVER GIVE BACK EMERALDS. So if you dismantle a Bakery (why would you do this?) that 70 Emeralds are lost.
Mode 4 – Store: this icon suspiciously looking like the Hugo, the Troll’s coin bag allows you to send an object directly to your storage. If it cannot be stored, it’ll inform you.
Mode 5 – X-Ray mode: this useful mode allows you to hide all non-collectable objects at the map, so you can clearly see all loot and load it into your sled.
Tip: You an use the X-Ray mode to light up cave locations.
Some cave locations, such as Wallmond’s Midnight Cave, Yuton’s Cave and Croonty’s Mountain Tunnel have a feature that they hide the loot when you avatar walks too far from it. It’s part of the gameplay. It also vanishes the structures inside the cave. However, when you use the X-Ray mode, all structures are visible again, giving you some orientation in the darkness of the caves. It will not make the loot at the ground visible, you’ll still need to search for it.
Mode 6 – Sled: it acts the same way as the storage, but instead of loading it to the storage it loads to your sled. You cannot load more than the sled’s capacity.
Note: at some lands, you may receive loot that don’t go to the storage. Only in this particular case, your sled will have more items that it can hold. You cannot travel while the sled is over its maximum capacity. If a land has no storage of its own, you’ll have to throw away some loot, losing it forever. Watch out for your sled capacity.
Mode 7 – Pickaxe: it allows you to select objects to be chopped down by your partner. See “Partnership Interface” for more details.
11 Combo Chop Option.
When chopping objects, you can chop it down completely or select how much of it will be chopped. This option allows you to alternate between these 2 modes of chopping. When off, you can select how much energy you’ll spend by clicking multiple times over an object or by click and holding the cursor over it. When on, all your current energy can be used. In both cases, you can cancel the action using the ”cancel all actions” button.
I’ll discuss strategies in a future section about energy management.
Tip: Learn when to chop an item completely and when to chop jsut part of it then finish with energy snacks.
9 Hide Neighbours
The first icon from right to left allows you to hide the Neighbourhood interface. It rearranges the icons in the screen so they do not occupy so much space. It’s useful to have a clearer look at your Home Station.
12 News
This interface shows the latest updates (temporary lands and events) of the game.
Tip: Prefer to see the news at the game’s news page. It has way more information and you can communicate with other players.
Note: the game lore happens at the beginning of the XX century. The dates will show as 1925. It’s not a bug.
13 Achievements
The Recognition Board interface shows all your in-game achievements. It’s a good way to track down the special prizes you receive along the time.
14 Map
This icon opens the Klondike Map. At first, most of it will be undiscovered. You will open new parts of the map as the game progresses, with recipes found in some lands. You can discover where to open these new lands at your Watchtower. Don’t be eager to open these lands though.
You can only have 15 lands opened at the same time. It looks a lot at start, but as the game progresses, more and more lands will be opened and you will have to close previous lands to continue. Take your time, one land at a time.
15 Adventures (info panel)
The most convoluted interface in the game. It shows the adventures and quests you are currently doing. Also, it does not show the whole lore, only half of the dialogues you encountered with NPC’s.
The Traveller’s diary doesn’t show all lands required to progress. You cannot rely on it to know where to go next.
I suggest to finish all lands in a region before moving into the next. This way, you are guaranteed to fulfil all requirements of progress and will not have to stop one expedition in the middle of it to start another because an item that can only be acquired in a skipped land.
16 Collections: Moved to other page for organization. There you can find the Visual Guide.
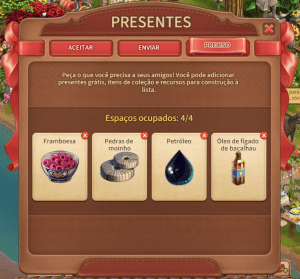
17 Gift Interface
One of the main aspects of Klondike is that it’s not a competitive game. Except for the occasional contests of decorations (I’m participating this year’s one) which are optional, the game itself has no competition.
You may consider that Leontius’ Mines is a form of competition, but you can only participate once and after finishing it you’ll get the main prize (Leontius’ Roullete) anyway, regardless your position.
Mazes and other ranking competitions focus on high end players, the whales who mainly support the development. These contests are add-ons, not part of main gameplay and can be skipped altogether. However I strongly suggest to participate, as the participation prizes are very good.
In Klondike, players are encouraged to help each other. This is the Neighbourhood System. Each player can have up to 3000 neighbours (no limit if you play at Facebook). They share the Gift and Trading System, that allows exchanging resources amongst their contacts.
ACCEPTING
You can gift to other players some of the items from your own storage. There is no limit of how many items or how much value you can give, however each player has a daily limit of how much they can receive as gifts or trades. Each item has a pre-defined standard value price in Dog Coins. This is the value subtracted from your daily limit. Your limit is restored daily when the game server starts a new day.
This limit is shared with the system of trading goods, which I’ll cover later. Regardless of system, gifting or trading, they both are linked to your Barns. Each Home Station must have at least 1 Barn. Besides being a place for some barters, the Barn is where your goods are fictionally ”stored”. You don’t need to build new Barns to store more goods, but it limits the amount you can trade/receive as gifts.
Tip: You can see your current limit and the amount spent in the Gift Interface, tab Special.
In order to increase you exchange daily limit, you have 2 options:
1) Pay Emeralds to increase you limit. You can do this directly at your Barn. Clicking your Barn you will see an option to buy limits. These options are random and some offers are better than others. Each time you click, the offers will change.
1) A better way is to buy improvements at your Market. Click Market >> Buildings >> Expansions. There you can see all available options to expand your Barn.
I personally never bought and don’t know any player that had bought this expansions, because the second option is generally better. I also don’t know if there is a limit of how many premium expansions you can buy.
2) Upgrade and build more Barns. Each new Barn you build will increase your limit in 55000 Dog Coins. Also each Barn can be upgraded, doubling this amount. There is no limit of the amount of Barns you can build, except for the space in your Home Station. Players focused on trading usually have ”oceans” of Trading Stalls and Barns.
Tip: New players should save Cheesecakes to build more Barns.
Story time
When I first started Klondike, I had no idea how to play the game. As I said, the info about the game is quite sparse and the in-game info help is terrible. Without knowing I had to get Bakeries to play properly, I spent my Emeralds for energy and dynamites. Without Bakeries, I couldn’t get materials and without materials I had to ask others for help.
But how could they gift me more items, if I only had 1 Barn? ”Build more”, you would say. But in order to build every barn, you need 5 Cheesecakes. Which are made at Bakeries. Which I didn’t have. Was I completely stuck?
Solution: every month you’ll receive 1 Cheesecake from the daily login gift. So I logged in every day for 150 days to get that 5 Cheesecakes and finally build my second Barn. From there, I could finally be gifted more items, build a small industry camp, get money to feed my chickens and, in time, trade 30.000 eggs for my first Bakery.
And only after that first Bakery, I could play the game properly. More and more energy, more items, more trades, more Bakeries.
GIVING FOR FREE
”Show who needs it”, or the short acronym SWNI, is integral part of the daily free gifting system. Every day you can gift 1 unit of an item to all your neighbours without actually deducting it from your storage. This free gift doesn’t count against your daily limit.
This is a very important part of the game. You cannot play Klondike properly without receiving these gifts on a daily basis. As each player can only gift 1 unit for free, it’s the sum of gifts from all neighbours that truly makes a difference. Each small gift counts. That’s why it’s so important to click the checkbox ”show who needs it”. That’s also a reason to keep increasing the amount of neighbours you have.
Even though the upper limit for daily free gifts would be 3.000 units (in the Portal), the amount of free gifts the system holds for you while you’re offline is 300. In order to get more free gifts, you need to stay online.
You can access this system at the Gift Interface, tab Free.
Tip: The daily gift is the main source for Raspberries. They are required to make Raspberry Chimes, the main source of energy in the game (40+). The other sources give too few to be worthy the work and should be considered mere bonuses. Raspberries are also a valuable good for trading. Premium players usually exchange their Bakeries and other premium items for Raspberries.
—
If you are a new player and have your Neighbourhood request denied, don’t be sad. It happens because right now you cannot gift Raspberries and some higher ups tend to maximize the amount of Raspberries they receive, avoiding players that cannot gift them.
—
Tip: If currently you cannot gift Raspberries, just gift the highest item that has opened to you, may it be Clay or Stone. Just remember to select SWNI for the items you can.
—
Tip: When sending your daily free gift, you can write a message to all your neighbours. This message can have up to 70 characters. This is your opportunity to ask for items, find new friends, get help or just say “Hello”.
—
Tip: The game holds only 300 free gifts while you are offline. To get more, you need to stay online. But you don’t need to be playing. Just keep the browser tab opened in the background. It counts to be online. I do it at my work. When I arrive at my office, I let the browser opened in Klondike, minimize it and do my job. Before going home, I collect all gifts and close it.
GIVING FROM YOUR STORAGE
Sometimes players will ask you for items they are experiencing shortage of. Shortages are common. Producing and consuming items in Klondike are completely unbalanced; you just cannot set a sustainable chain of production. The numbers never match. You will always be cyclically or in excessive surplus or in desperate shortage of any given item. At one moment you have hundreds of thousands of eggs. Next week you’ll be begging for them. That’s the fun.
To gift someone from your storage (and get rid of your surplus), you have 3 routes. One is to go to your storage, find the item you want to give and click the small gift icon at its bottom right. From there you can search the players that needs the item, both by name in the search bar or clicking again the SWNI checkbox.
The second is directly in the gifting interface. Bellow each neighbour’s picture there is the same small gift icon. Clicking it will pop up the items that player requested. If the gift icon isn’t there, they didn’t set anything.
The third way is to hover your mouse over your neighbour’s picture at the bottom bar in the game screen. It will show a pop up box with the items they need.
I NEED
The 3rd tab in this system is the ‘I NEED’ tab. Here you can set at most 4 items that you currently need. Wherever you find this plus icon besides an item during a Barter (see the picture at Notebook), or anywhere else, it’s a shortcut to this feature.
Tip: Set only 1 free giftable item. After you send a free gift to someone, you cannot send another in the same day. There is no point putting both Raspberry and Clay, or Wind and Stone at the same time, because you will only receive 1 of them per player from the free system. It is wasting a slot for another item that you may need.
—
Tip: You can change your wishlist anytime during the day, however other players will only see the new items after THEY refresh their games, usually logging off and in again. It’s not automatic server wide and for some time you will keep receiving the items previously in your wishlist. So, avoid changing the list and immediately ask for it in your daily message. It’s better to ask for them the next day.
—
Tip: Wind Messenger is a technique players developed spontaneously. Wind has no cost to sell or receive. So, if you need to talk to someone, you can use the gift system, exchanging 1 unit of Wind to send and receive messagens. This is a workaround to the fact Klondike still has no chat service even after all these years players asking for it…
18 Story Adventures
I’m not sure if I’ll make myself clear in the following explanation, as I could not find a way to direct translate my thoughts into English. If you have any doubt, don’t hesitate in contact me.
Klondike’s core game mechanic is played in two (only two, really) basic ”game boards”. One is your Home Station. This ”game board” is the main one, where you can produce your goods, hire workers and access main Market items. You can harvest crops, raise livestock and plant trees. You can also decorate it as you want.
It changes over time, but not so often. As the years passed by, it got improvements, new features and expansions. It’s a starting point to prepare yourself for the adventures ahead, but it does not have all Klondike has to offer. Many things must be bartered or discovered in other places.
These stations full of riches and treasures are the second ”game board”, which we call ”lands”. These are places you explore using up your energy. Each step of exploration gives you goods or treasures you can pick from the ground, load into your sled and bring back home. Also, each one of these lands may have barter options, where you can acquire new goods unavailable elsewhere.
It should be easy and straightforward; however Klondike has no sense of easing your way around. There are many different types of lands to explore, each type accessible from a different route.
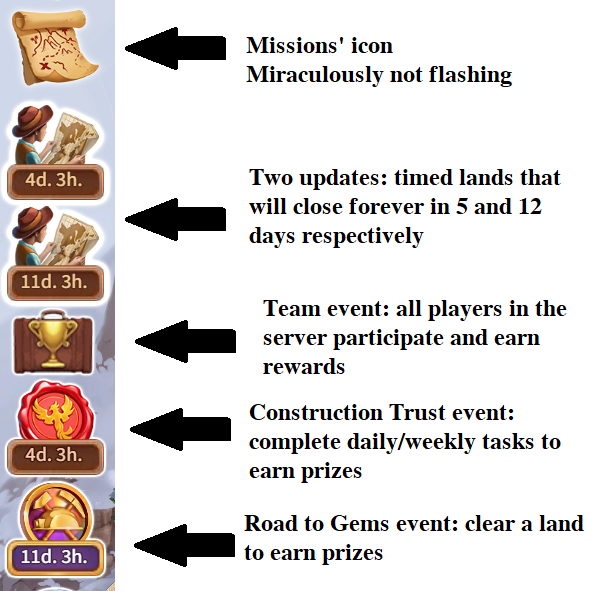
Interface 1 – Map: the Map lets you access 4 types of lands:
A partial sight of the map.
a) Permanent lands – Traveller: lands that tell the main storyline, were your main character needs to find his/hers parents’ Lost Expedition.
b) Permanent lands – Side stories: lands that aren’t part of the main story, but you will eventually need to do in order to barter for special items and complete the main storyline.
c) Timed lands – Challenge: DO NOT START THEM. These lands disappear completely after some time, some even after just 7 days. Beginners will not be able to complete them. These lands are challenges for more experienced players, with good rewards. They are permanently available, so you can start them anytime in the future.
d) Timed lands – Updates: also intended to players that already have finished the main storyline, every Thursday a new land appears and some of the previous ones disappears forever. They are time limited to 7, 14 or 21 days at most, which means you can have up to 3 update lands at the same time.
Interface 2 – Railway to Dawson Side quest
Eventually you will receive a quest to build a train in your Home Station. This train gives you access to 20 lands of the Railway Side quest. I’ll cover them later.
Interface 3 – Forgotten Bay
Eventually you will receive a quest to go to Rocky Coast, a Time Land – Challenge. Once finished, you will gain access to a second Home Station in an Island and from there access the sea adventures lands, but Rocky Coast will disappear forever. I’ll cover them later.
Interface 4 – Event Lands
Periodically you will have even another interface to access some special lands. They are accessible only from special icons.
Interface 5 – Story Adventures
Finally the main subject of this section, the Story Adventures Icon is even another interface to access lands. These are special time restricted lands that beginners should avoid. I know it’s quite annoying to have the icon flashing non-stop, but believe me, these lands are hard.
Tip: Rule of thumb, beginners should avoid anything time restricted, as they just cannot complete before the deadline, will not have a second chance and will lose forever the prize for the land’s completion. Unless you’re a premium player. In this case, you can do any land anytime you want, buying energy and dynamites with Emeralds.
Yes, I know the struggle. Sometimes I just want to nuke the whole place. No wonder Leontius went crazy.
Story Adventures are missions that tell the side stories of the other characters in Klondike. Each character you encounter in the game has a personal story and background, told throughout so many updated lands. These Adventure lands dive a little deeper in their personal lore, allowing you to play not as your main character, but as one of these side characters.
Features:
Adventures share their storage with your Home Station storage. This means you won’t need to travel to bring goods back home. Every object chopped down goes directly to your Home Station’s storage. You also have access to all your energy snacks and dynamites stored at home.
These lands are time limited. You have 30 days to finish ALL THE LANDS that form the chosen adventure after you start it. E.G Saving Granthill has 7 lands which sum up a requirement of 140.000 Energy Points. Regardless if you complete it or not, it will close forever and the prizes not acquired also will be lost forever.
You have 3 stages per character, each stage depends on closing the previous stage.
19 Events
Just below the Story Adventures’ icon, you will find Event icons, if any is available at the moment. These events are periodical, but never exactly the same. The prizes and gameplay usually change a little bit from edition to edition, just enough to keep a sense of fresh challenge.
The main events that happen in Klondike are:
Construction Trust – Mr Clark, the great tycoon of Klondike wants to hire you to another fundraising enterprise. Daily and weekly you will receive tasks to complete. The more tasks you complete, the more rewards you receive.
Time to build Klondike
Tips: During Construction Trust, try to fulfil as many tasks as you can. Usually tasks are set accordingly to the player’s level, but even so, you may not be able to complete some. In these cases, do not hesitate in drop that task and wait the timer for another one. If even changing many times you cannot complete, specially the weekly quest, don’t worry. In time you’ll be able to do them all.
—
Tip: One of the many rewards in all Construction Trusts is permanent sled improvements. I cannot stress enough how important for a new player is to get them.
—
Tip: Another of the many rewards are Bonuses. These bonuses speed up production, save resources or multiply outputs. Try to get them. They cannot be bought in the Market, only earned during events or sold during special updates.
—
Tip: You can pack/unpack livestock food to fulfil tasks. If you currently don’t have resources to produce more, you can just pack/unpack the ones you already have in the Barn using Dog Coins. It will count as produced.
—
Tip: Food you prepare in Railway Side Quest DOES NOT COUNT towards task completion. Sometimes you will receive the task to make Sausage. Even though you can make them at Railway lands, they don’t count. You need to make them in Map lands, such as Polar Side.
—
Tip: Grass made at fountains COUNTS to ”cut anything” task. One of the hardest weekly quests is ”cut this type of object”. They can be objects marked with pickaxes, axes or shovels. Every time you discard this task, another of the same type appears. I usually beat this task discarding until the ”chop anything x 100” task appears. Once it appears, I make grass at Fountain for Coins. Each one of them needs just 5 energy units, in contrast with objects in lands, which need way more. Placing 100 grass patches at Home Station, you can use just 500 energy to beat this quest and earn 100 points.
Construction Trust – Premium
Everything, every single item in Klondike can be earned for free. In the case of Construction Trust, the Premium rewards can be earned for free if you completed other event, the Mazes, at the top positions. But sincerely, for just 10 bucks it is way easier to just buy them. Construction Trust is the way to go if you want to start premium gameplay. It is by far the cheapest option to get the most powerful items (Improved Bakeries, +3000 Falling Backs, Super Spinners and more) besides the most beautiful decorations, high end dynamites and energy snacks. It’s way cheaper than anything else and has the best ratio price/value of all events.
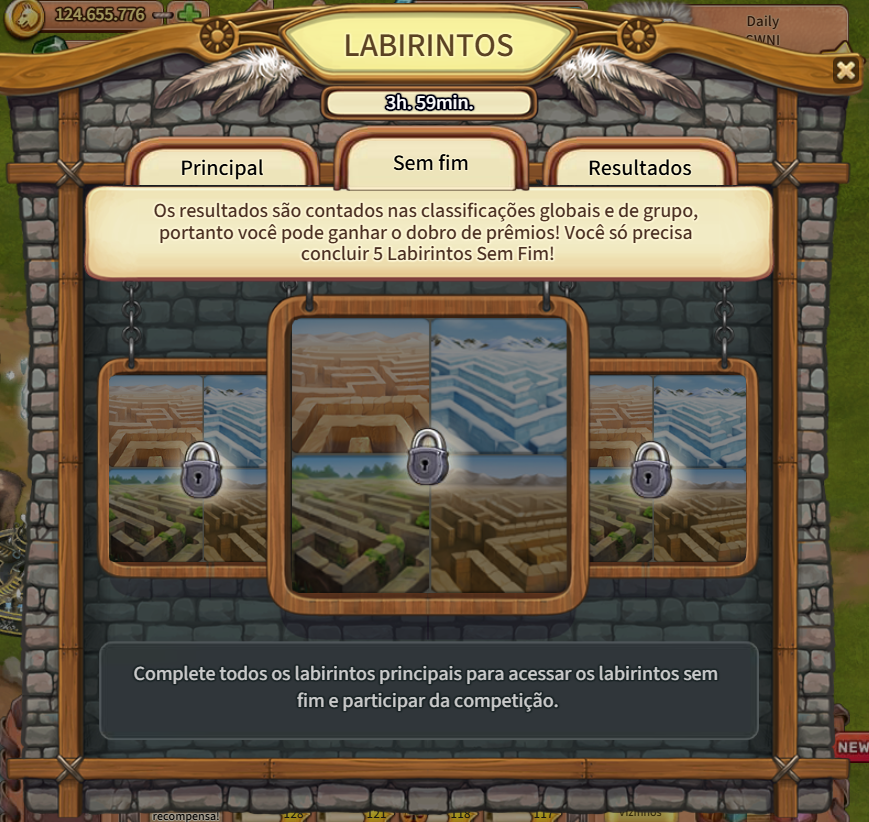
Mazes
The Mazes Event itself changes a little every edition, but the core mechanics stay the same. Through a special icon, you open the interface to access the Mazes. They are special Event Lands that do not need to be cleared 100% to win, only the amount necessary to find the maze’s exit.
Mazes are randomly generated. Each player has a different maze to clear in order to discover the exit. Usually there are main mazes and infinite mazes. The main mazes’ completion is required to win the event and earn the main prize. Recently the number of main mazes dropped to just 4 and remains the same for some editions. Once the main mazes are cleared, you get the main prize and you can do the optional infinite mazes. You can do as many randomly generated mazes you want and, the more exits you find, the more rewards you earn.
You can do the Infinite Mazes after completing the main ones. Currently they are 4, but once they were 6 or more.
Features:
Mazes are random: each player has a different gaming experience. The costs for each object follow the player’s level. Beginners have easier mazes, while higher level players have more difficult ones. The costs do not increase as you do more mazes (they don’t become more difficult as you progress in the same edition), keeping the challenge fair.
Storage: alike Story Adventure lands, mazes don’t have storage of their own. This means you won’t need to travel to bring goods back home. Every object chopped down goes directly to your Home Station’s storage. You also have access to all your energy snacks and dynamites stored at home.
Acionide: This colourful mineral is only acquired from a Maze’s Treasure Chest. There are two types of Acionide, Red and Blue. Both are sought by the Merchant and the Smuggler respectively. These NPC’s wait for them at the start of every Maze and exchange the Acionide you find there for precious and powerful rewards. Blue Acionide is very hard to find, therefore the Smuggler barters the rarest items in the game.
Closed Trunks: When you pick small heaps of gold coins in the mazes, you receive Closed Trunks. These trunks contain useful items and collections. You can open them using special workbenches sold by the Merchant and Smuggler for Acionide or Emeralds.
Tip: Mazes are not worthy to be completed 100%. Just try to find all treasures containing Acionide and Closed Trunks.
—
Tip: The rewards inside Closed Trunks have less value than the main items sold by the Merchant. Only buy workbenches after you already bought the more important things from him, specially the Puzzles.
—
Tip: Mini Bakeries are a good prize if you buy them with Acionide, but they are not worthy their value in Emeralds. They can only make energy snacks up to +35 energy and some recipes are more expensive than normal Bakery’s ones. They are only useful for beginners or high end players that use them to make flour.
—
Tip: The House for Two is a decorative building with a misleading name. You may believe these “two” are housing for workers, but they refer to the 2 barters available inside it. You can melt Ice and make Sausages, both items abundantly got in the mazes. It’s useful, as you won’t need to go to Wind Song or Indigo to melt Ice anymore. And is one of the most beautiful decorations in the game.
Yes, I do prefer the old avatar design.
Story time
Since I started Klondike, I always wanted to have the Golden Statue Collector, a special Item sold by the Smuggler. It is a special Inuk house that helps you to fish and collect golden statues. It is very useful to fast collect golden trees from Orchards, rabbit golden statues etc. I wanted it very very very much.
So for 2 years I used exclusively the snacks made in my Bakeries to exploration and harvesting crops. Every single other snack I got, regardless the energy size, went to storage. I end up accumulating tens of thousands of them. After so much preparation, I finally felt myself prepared to the challenge.
I dumped over 140.000 energy during a Maze edition to complete only 60 mazes. It is required to do at least 100 mazes to receive the ultimate (optional) reward (the Golden Maze Guardian) and so much more, maybe twice or thrice this, to have enough Blue Acionide for the Golden Statue Collector.
Then I decided that such challenge is not fun for me. After all, I am playing all this time without the collector. I consider myself retired from Mazes. I will not try again unless the Blue Acionide drop rate increases significantly. It’s too much energy for too little return. And I still have 473 Closed Trunks to be opened.
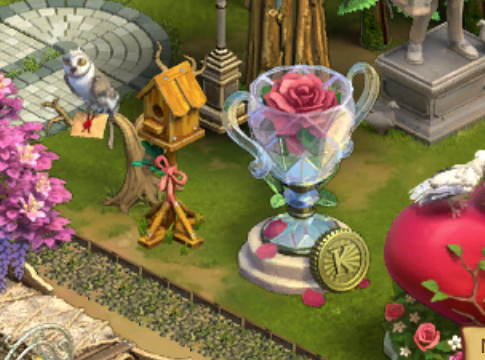
Below is my honorary trophy for high positioning in Mazes besides Buba, the Owl.
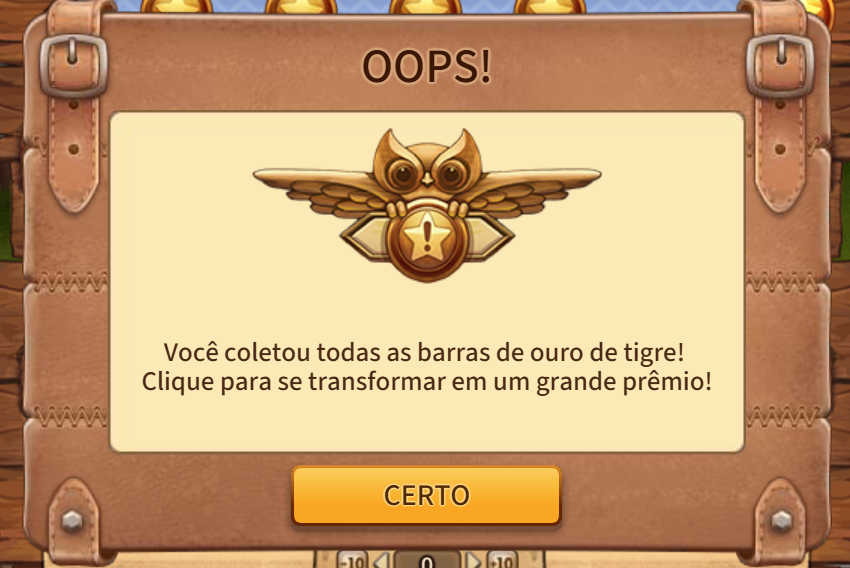
Tiger Mines
Another event that gives temporary access to special lands is the Tiger Mines Event. Alike Mazes, these lands are accessible only by an interface opened clicking a special icon that appears when the event is active.
Periodically the NPC Mohan Rich comes to your Home Station asking for Bismuth. Just like the Merchant and the Smuggler, he exchanges Bismuth for prizes. The main difference is that he stays in your station, instead of the lands.
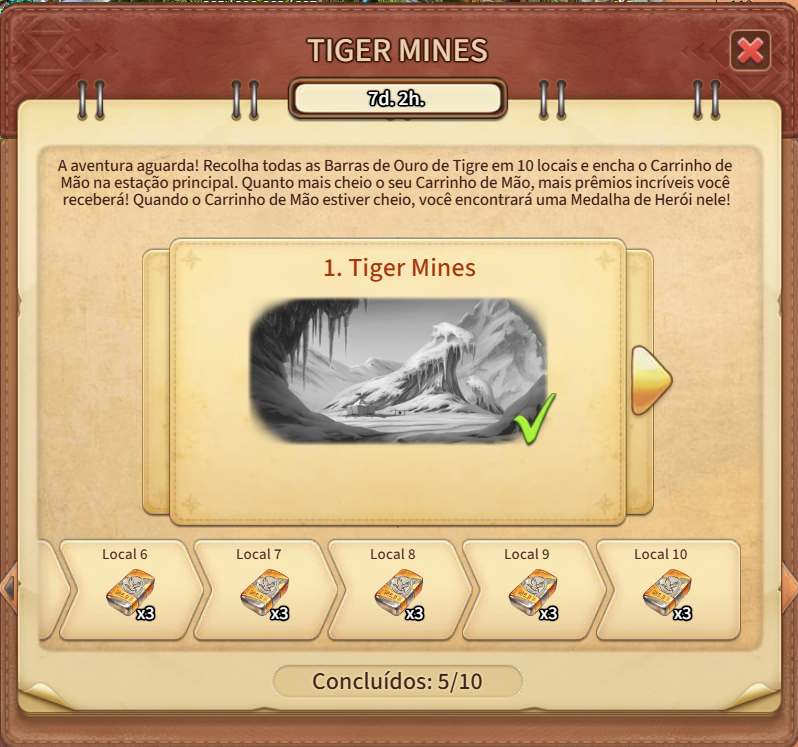
The event consists of 10 lands. Each one of these lands has 5 miners that lost their equipment to bandits. You need to retrieve the mining equipment and give it back to them. Once done, you can proceed to the next land.
You can only acquire the prizes from the Wheelbarrow after the event has finished, regardless how fast you completed the 10 lands. Take your time, as this event lasts almost a month.
Features:
Wheelbarrow – At the start of any edition of Tiger Mines Event, you will receive a building called Wheelbarrow. For each land that you complete the main task of helping the 5 miners, you earn the tokens to build 1/10th of the building. The more lands you complete, the more rewards you receive by finishing the building.
Merchant – In all these lands you will find the Merchant waiting for Gold Dust. You will find in all these lands 5 places to collect Gold Dust. Giving it to the Merchant will reward you with energy snacks. He doesn’t sell anything.
Emeralds – The Tiger Mines Event is the best one to get Emeralds. Unlike Mazes, Tiger Mines are ALWAYS worthy to be completed 100%. You receive prizes the more you clear the land: Barrels and Boxes full of resources and energy and the Crowbars required to open them.
Bismuth – Recently the event had the addition of Bismuth. For each object you chop down at these lands, you receive some Bismuth that can be bartered for useful items with Mohan Rich.
Signal Tower Roulette – This spinner is directly related to the Tiger Mines Event. In order to spin this roulette, you need Courage Coins. These coins are acquired when you exchange the Courage Collection, which in turn is only found at the Tiger Mines Courage Chests. Many editions of the Tiger Mines allow you to upgrade the Signal Tower with the Hero’s Medal reward, awarded when completing 100% of the event. The more you upgrade the spinner, the better the rewards.
Storage: alike Story Adventure lands and Mazes, the Tiger Mines don’t have storage of their own. This means you won’t need to travel to bring goods back home. Every object chopped down goes directly to your Home Station’s storage. You also have access to all your energy snacks and dynamites stored at home.
Tip: Always try to complete 100% of each land. Even if you cannot do all of them. The Emeralds given as prize for completing each land are worthy the trouble.
—
Tip: Unused items in a season of Tiger Mines will be carried to next one, as they can be used in recurring events. All Bismuth, Gold Dust and Miner’s equipment found are never lost. The same for the Barrels and Boxes. Even if you cannot find all Crowbars to open them, they can be opened in next season. Also, sometimes a event will sell extra Crowbars to let you open treasures.
—
Tip: Tiger Mines were my main source of Emeralds to buy more bakeries at the start of the game. 2/3 of my bakeries were bought thanks to this event. The others were acquired by bartering with other players.
—
Tip: Tiger Mines become harder as the player increases their level. They are best for beginners and high end players.
These lands are never the same for each player, even players with the same level.
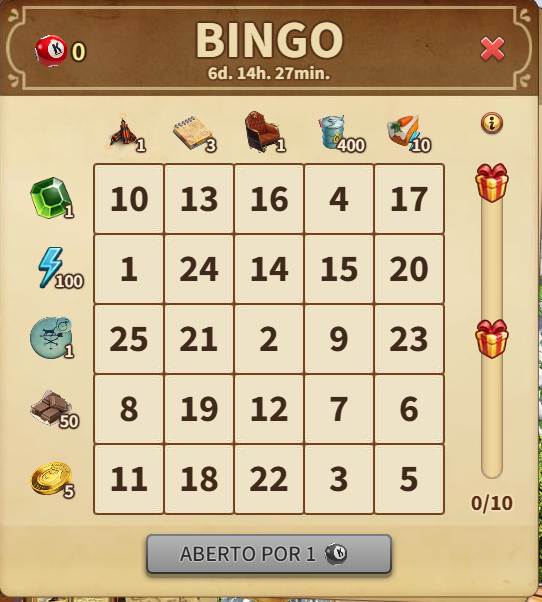
Bingo
The Bingo Event is very a simple one. This event is always tied with an update land.
Some lands will have Bingo items scattered all over the place. You need to explore the land to find them. Once found, you can play the Bingo in the exclusive interface opened by clicking its icon. The more numbers you find, the more rewards you get.
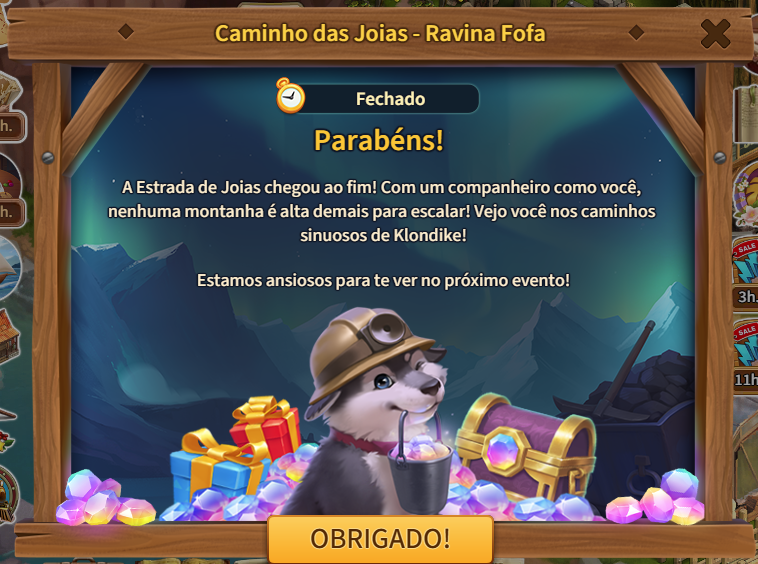
Road of Gems
The newest event, first edition happening at April, 2025. It is a mix of Construction Trust, Tiger Mines and Bingo.
Tied to a specific land, each object you chop down gives back you Gems. The more Gems you collect, the better your rewards. Unlike Tiger Mines, you don’t choose the rewards, they are given in a pre-determined order, like the Construction Trust. And as Construction Trust you can go premium (5 bucks) and receive even more rewards.
The prizes are very good, on par with Construction Trust. But it’s way faster, as it’s tied with an update land. Like Bingo, you can get all prizes in a single day, if you have energy enough.